Getting Started with Chef on Windows Server - Part 1 Intro
I’ve never had the opportunity to work with configuration management software, but a recent project has pushed me over the edge from “Wow, that sounds really cool in theory!” to “Well, I’d better get my feet wet!”.
As the learnchef.com’s Windows page is currently under construction , I thought I’d write my efforts up to help anyone who might also be getting their feet wet for the first time in the configuration management space using Chef on Windows.
IMPORTANT: As I’m writing these posts while going along, it’s not to say that any of what’s reported adheres to Chef’s best practices. So if you notice any glaring errors, please say so in the comments!
In this series I intend to explore what I understand to be the glorious trifecta of configuration management on Windows:
At the start of this series we will have a very rudimentary/non-existent understanding of the three elements above, and will work through each individually, then tie them together (if possible).
This first post will be dedicated to an introduction to Chef on Windows.
Chef – Configuring a Package and a Service
About Chef
Although LearnChef’s Windows page is under construction, they still have a fantastic introduction on RHEL (Redhat Enterprise Linux) which even provides you with a preconfigured VM! I would highly recommend running through this just to get a basic intuitive feel for Chef if you’re on the fence and not sure if you can be bothered to spin up your own 2012 VM and install things yourself.
Steven Murawski has a good blog post “Is the Chef Learning Curve Worth it?” which, while obviously a little biased as he’s now a community manager at Chef, gives a good overview of why you would use Chef on Windows and answers some of the main questions surrounding Chef on Windows.
Pre-requisites
The following steps will require:
- Windows 2012 R2 (in theory this should work on 2008 R2+ so long as you have PowerShell 4.0, but I haven’t tested it)
- Powershell Understanding – Basic: Microsoft Virtual Academy – Getting Started With PowerShell
- Basic understanding of what Chef is (ideal, but not required).
Steps
We’re going to pretty much steal the exact steps from the RHEL Configure a Package and a Service lesson, mix it with the legacy Windows tutorial, and see what happens!
1) Install Chef & Chef Development Kit
Install the Chef Client and the Chef Development Kit on your 2012 R2 VM.
2) Generate a Cookbook
We’re going to create a cookbook that installs IIS and generates a custom Default.htm to display.
The working directory for Chef in Windows looks to be C:Chef by default, so
cd c:\chef\cookbooks chef generate cookbook webserver
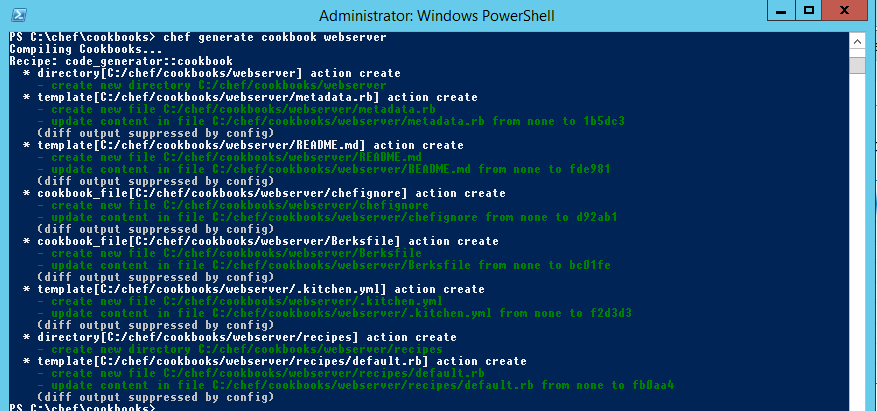 This will generate the structure and default files for a cookbook named “webserver”.
2) Configure the Default Resource File
Now we need to write the Ruby that will define the following:
- Install IIS
- Start IIS
- Populate Default.htm with our message
To do so we’ll edit default.rb in the recipes directory of the webserver cookbook.
Notepad C:\chef\cookbooks\webserver\recipes\default.rb
Then define the following in the file. EDIT: Amended thanks to @cjeffblaine!
powershell_script 'Install IIS' do
  action :run
  code 'add-windowsfeature Web-Server'
end

service 'w3svc' do
  action [:enable, :start]
end

template 'c:inetpubwwwrootDefault.htm' do
  source 'Default.htm.erb'
  rights :read, 'Everyone'
end
This will execute Add-WindowsFeature Web-Server in a PowerShell context (installing IIS if necessary), then start IIS, and copy the contents of Default.htm.erb to C:\inetpub\wwwroot\Default.htm and give everyone read access, so we’d better define the contents of Default.htm.erb!
3) Create a Template
Templates allow you to use variables from Knife which include basic info like IP and Hostname by default, but can also be populated with custom information using data bags. An obvious example of a use-case for templates is for populating web.config information like DB connection strings.
chef generate template webserver Default.htm

If this throws an error saying Chef was not found, ensure you’ve installed the Chef Development Kit.
Next we need to edit the template file to reflect our custom splash page!
Notepad C:\chef\cookbooks\webserver\templates\default\Default.htm.erb
In this file we just enter a simple web page.
Hello World!
4) Apply the config!
All done! Now we can apply the configuration!
chef-client –local-mode –runlist webserver
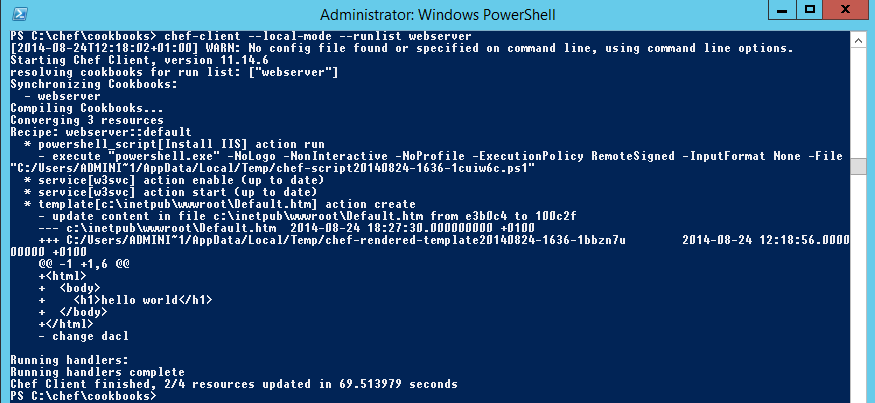
All this does is kick off the Chef client in local mode specifying a runbook called ‘webserver’, but in the background Chef beavers away installing IIS, starting it, and customising the default.htm page.
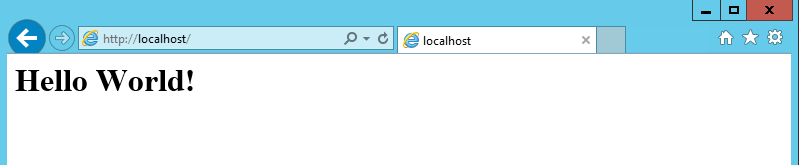
Voila!
5) Reapply the Configuration
We can now reapply this recipe over and over again, and each time Chef will check the config we’ve declared in the recipe against the actual configuration, and bring it back in line as necessary.
chef-client --local-mode --runlist webserver
So you can delete your default.htm, uninstall IIS, disable the service, but as soon as you run the code above, it will all be reset in accordance with your recipe!
Summary
Now those of you familiar with configuration management will be feeling a bit underwhelmed at this point. Where’s the automatic application? Where’s the centralisation? Bootstrapping? You didn’t even define any variables in your template!
Not to worry, we will do that in the next post.
Further Reading
Redhat Enterprise Linux / CentOS Training – LearnChef
Chef Reference – Chef.com
Is the Chef Learning Curve Worth it? – Steven Murawski
Chef Fundamentals Webinar Series – LearnChef